Aorta: power without the bird's nest
Every robot I've ever built died the same death: not a dead motor, not bad code — the wiring. A bird's nest of jumper wires, barrel jacks, and hope, until one day something shorts, something browns out, and you're unwrapping a harness with tweezers to find it. Bobby gets a different ending. Bobby gets an Aorta.
Why "Aorta"
This board started life as the "spine PCB," but the name was wrong. A spine carries signals — this board carries power. The battery is the heart. The board that takes the heart's output and feeds every organ is the aorta. So: Aorta, Block 1 — the foundation everything else bolts onto. Get power distribution right and the whole build is solid organs. Get it wrong and it's a maintenance nightmare with a pretty shell.
One board, four rails
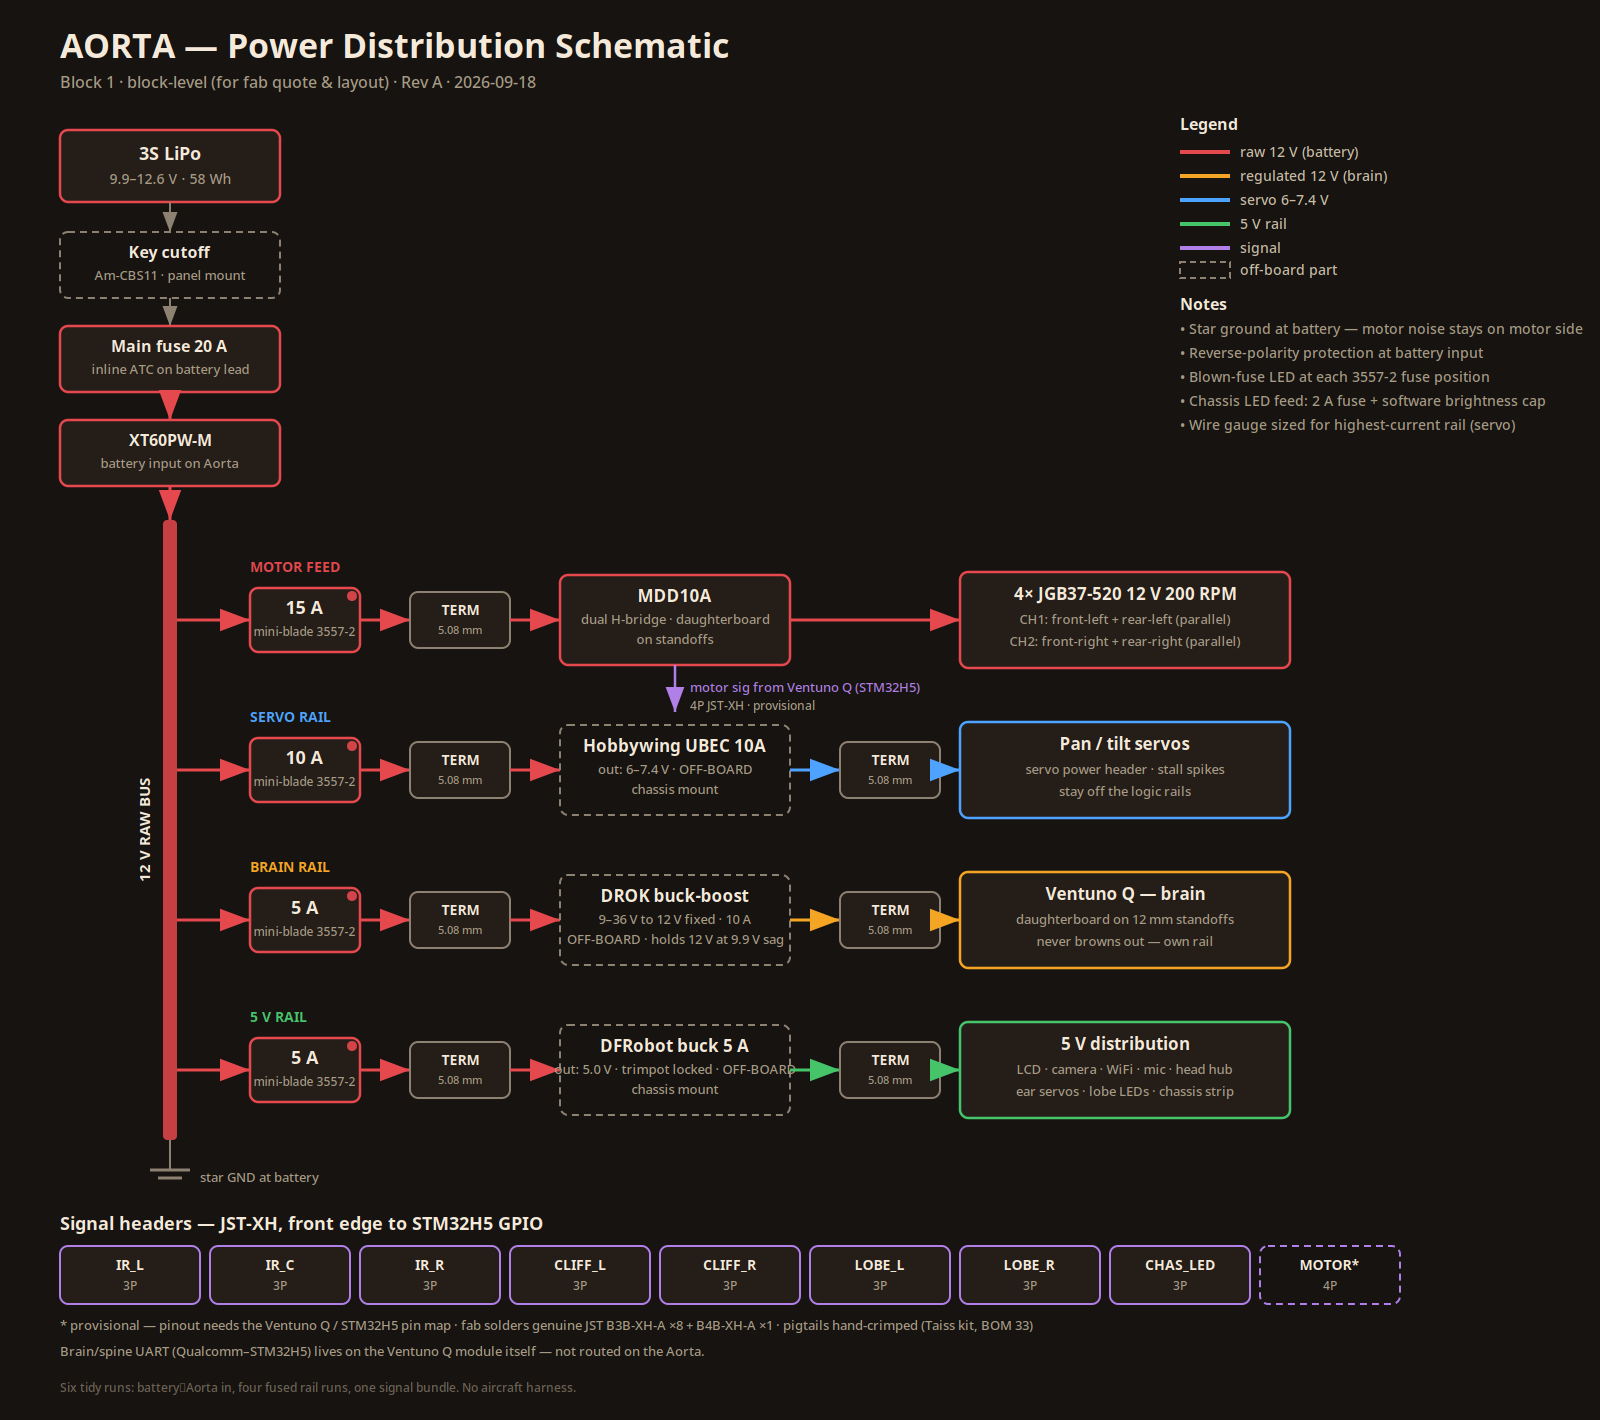
The schematic above is the whole philosophy on one page. Battery comes in through a key cutoff and a 20 A main fuse, hits an XT60, and lands on a raw 12 V bus. From there, four fused rails branch off — and nothing shares what it shouldn't:
Motor feed (15 A fuse) — raw battery straight to the MDD10A dual H-bridge, which drives all four wheel motors. Motors eat electrical noise for breakfast, so they get the dirty rail all to themselves.
Servo rail (10 A fuse) — through a Hobbywing UBEC stepped down to 6–7.4 V for the pan/tilt servos. Servo stall spikes stay quarantined here, far away from anything that thinks.
Brain rail (5 A fuse) — through a DROK buck-boost that holds a rock-steady 12 V even when the 3S pack sags to 9.9 V. The Ventuno Q never browns out, never spikes, never shares. A pure buck can't do this — when the pack dips, a buck dips with it. Buck-boost or bust.
5 V rail (5 A fuse) — a DFRobot buck set to 5.0 V feeding the LCD, camera, Wi-Fi, mic, USB hub, ear servos, and every LED on the droid. Trimpot gets verified with a meter, then locked with hot glue.
Protection is a feature, not a fuse aisle
POWER PROTECTION
| Main fuse | 20 A inline ATC on the battery lead — protects the cable, not just the board |
| Cutoff | Am-CBS11 key switch, panel mount — removable key, hard disconnect |
| Rail fuses | Mini-blade 3557-2 at every rail: 15 A motor, 10 A servo, 5 A brain, 5 A 5 V |
| Blown-fuse LEDs | One per fuse position — dead rail announces itself |
| Reverse polarity | Protection at the battery input — because 2 AM wiring happens |
| Grounding | Star ground at the battery — motor noise stays on the motor side |
| LED strip | Own 2 A fuse + software brightness cap — pretty can't brown out the logic |
The main fuse sits off the board on purpose. A PCB-mounted fuse would leave the battery-to-board cable unfused, and a 3S LiPo can dump terrifying fault current. The primary fault gets contained in a sealed inline holder, away from the electronics. The four little rail fuses live on the board because they're low-energy branch protection — and because a blown-fuse LED beats a multimeter at midnight.
Six tidy runs
Connectors are Phoenix Contact MKDS 3 screw terminals (the nice ones — the cheap ones fail hard), genuine JST-XH headers the fab solders for me, and hand-crimped pigtails everywhere else. Total wiring leaving the Aorta: battery in, four fused rail runs, one signal bundle. That's it. Servicing means unplugging a connector, not performing surgery.
The 70% rule
Here's the part that keeps the build moving: the Aorta is at roughly 70% — schematic locked, rails locked, fusing locked, connector strategy locked. That's enough to freeze the board outline and keep-out zones, which means structural design can start now, in parallel, instead of waiting on perfection.
The remaining 30% is physical truth: mounting-hole diameters, module footprints, connector heights. That gets finalized when components are in hand and the calipers come out. Measure twice, fab once — but don't let the last 30% hold the first 70% hostage.
Want in?
This build is documented in the open, every phase, including the mistakes. If you make PCBs, connectors, filament, or anything else a droid is made of and you'd like a sticker riding on Bobby — the door's open. Let's talk.
← Back to the build log